
Reverse Proxy Setup
To use Spokes securely over the internet, you must put it behind a reverse proxy to handle HTTPS encryption. Here are instructions for the two most common options.
Option A: Nginx Proxy Manager
Section titled “Option A: Nginx Proxy Manager”Nginx Proxy Manager (NPM) provides a simple web interface for handling SSL certificates and reverse proxying.
Creating the Proxy Host
Section titled “Creating the Proxy Host”- Open your NPM dashboard and navigate to Proxy Hosts.
- Click Add Proxy Host.
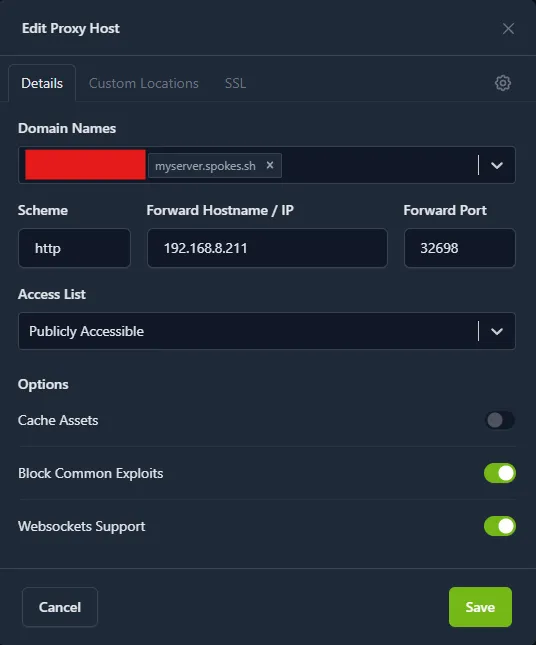
- Details Tab:
- Domain Names:
spokes.yourdomain.com - Scheme:
http - Forward Hostname / IP: The internal IP address of your Spokes server (e.g.,
192.168.1.50). - Forward Port:
8080(or your custom Web UI port). - Block Common Exploits: Enable
- Websockets Support: Enable (Crucial! Spokes relies heavily on WebSockets for real-time chat and LiveKit signaling).
- Domain Names:
- SSL Tab:
- Select Request a new SSL Certificate.
- Check Force SSL.
- Check HTTP/2 Support.
- Click Save.
Your Spokes instance is now securely accessible via HTTPS!
Option B: Cloudflare Tunnels
Section titled “Option B: Cloudflare Tunnels”Cloudflare Tunnels are an excellent way to expose your Spokes Web UI securely without opening inbound ports on your router for web traffic.
Proxying the Web UI
Section titled “Proxying the Web UI”- Create a tunnel in the Cloudflare Zero Trust dashboard.
- Install the
cloudflaredconnector on your Docker host. - In the Public Hostname configuration:
- Subdomain: e.g.,
spokes - Domain:
yourdomain.com - Service Type:
HTTP(or HTTPS if your host proxy handles SSL locally) - URL:
localhost:8080(or your custom Web UI port).
- Subdomain: e.g.,